加载中...
此内容根据文章生成,并经过人工审核,仅用于文章内容的解释与总结
无关的吐槽
好久没更新了,可能是因为游戏繁忙,也可能是太懒了,跟域名一样哈哈,.com的网站域名因为之前是在国外网站上买的,不能备案,想着等过期了转到国内来,以为只要不续费过几个月就会被释放出来,在国内在重新申请就可以了,果然还是我太天真,百度了一下才知道域名过期了还要经历赎回期,删除期,才会被释放,以为不过也才几个月而已,结果一查,之前买的域名商续费了一年挂在那里,所以要我等一年,结果跟你看到的一样被迫换成了.cn,不过确实便宜了不少。不过去友链申请的时候又就要开始流水线操作了,还要被调侃哈哈。
最近每次打开网站都是来自51LA的错误,看到Heo发的一篇部署umami的文章,就想着也弄一个来替换掉51LA。
来自heo的调侃
配置教程
我是先从GitHub上先把umami的压缩包放到服务器上再解压,使用的最新版本,想着用MySQL+Docker来部署,部署完后发现是1.33的版本,无法获取token和统计api,原因在于使用了低版本的MySQL(5.7.44),后面又换成Postgresql,发现Pgsql数据库是Docker打包好了的,不用下载,我还傻乎乎的去下载了一个,然后还导致端口冲突
Umami 基于Node.js 开发,采用 MySQL 或 Postgresql 数据库存储数据
- Node.js 18.17 或更高的版本
- 服务器上安装了 MySQL 8.0 或以上 或 Postgresql 12.14 或以上
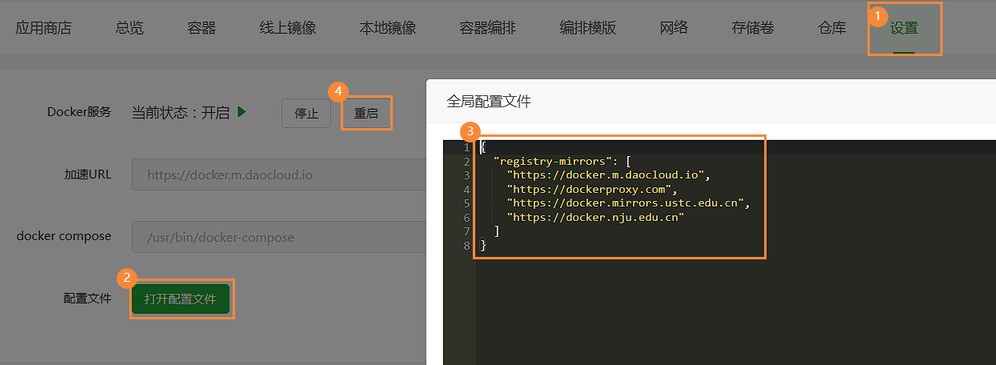
下载完成后解压到服务器,先要设置一下Docker加速URL,不然你可以等一天

1
2
3
4
5
6
7
8
| {
"registry-mirrors": [
"https://docker.m.daocloud.io",
"https://dockerproxy.com",
"https://docker.mirrors.ustc.edu.cn",
"https://docker.nju.edu.cn"
]
}
|
请注意删除注释以及修改相关配置,修改在umami文件夹下的docker-composer.yml文件。
1
2
3
4
5
6
7
8
9
10
11
12
13
14
15
16
17
18
19
20
21
22
23
24
25
26
27
28
29
30
31
32
33
34
35
36
37
38
39
40
| ---
version: '3'
services:
umami:
//使用南京大的ghcr镜像:ghcr.nju.edu.cn
image: ghcr.nju.edu.cn/umami-software/umami:postgresql-latest
ports:
//默认运行的端口,可以跟改为别的闲置端口
- "3000:3000"
environment:
//Umami数据库设置,可修改,但也请修改 PgSQL 镜像中的配置信息
DATABASE_URL: postgresql://umami:umami@db:5432/umami
DATABASE_TYPE: postgresql
APP_SECRET: replace-me-with-a-random-string
depends_on:
db:
condition: service_healthy
restart: always
healthcheck:
test: ["CMD-SHELL", "curl http://localhost:3000/api/heartbeat"]
interval: 5s
timeout: 5s
retries: 5
db:
image: postgres:15-alpine
ports:
- "5432:5432"
environment:
POSTGRES_DB: umami
POSTGRES_USER: umami
POSTGRES_PASSWORD: umami
volumes:
//PgSQL数据库镜像数据存储的路径,请酌情修改
- /www/wwwroot/umami/PgSQL:/var/lib/postgresql/data
restart: always
healthcheck:
test: ["CMD-SHELL", "pg_isready -U $${POSTGRES_USER} -d $${POSTGRES_DB}"]
interval: 5s
timeout: 5s
retries: 5
|
在docker-composer.yml文件目录下,运行下列命令:
容器构建完成可以访问http://ip:3000 进行查看使用
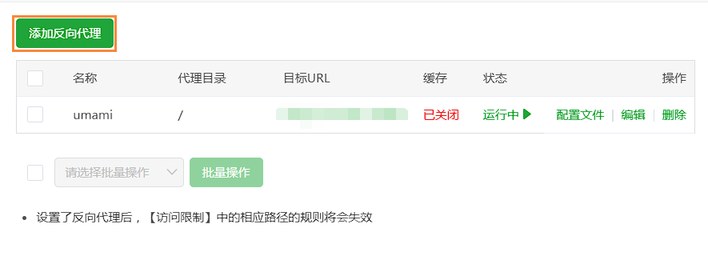
添加反向代理
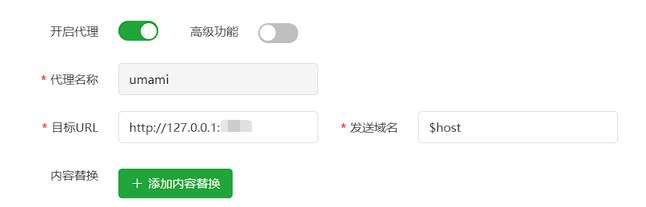
创建一个php静态站点,点击设置 → 反向代理 → 添加反向代理
目标URL:http://127.0.0.1:你的端口 , 发送域名:$host ,没改端口默认就是 http://127.0.0.1:3000
改完之后就可以通过你的域名来访问了
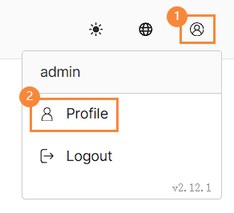
设置中文
默认用户名:admin,密码:umami 进去之后先改为中文
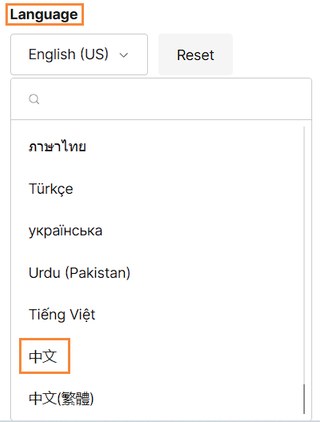
找到语言,改为中文
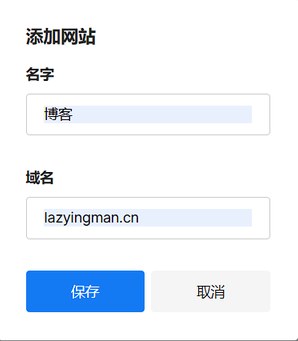
添加网站
找到设置 → 添加网站
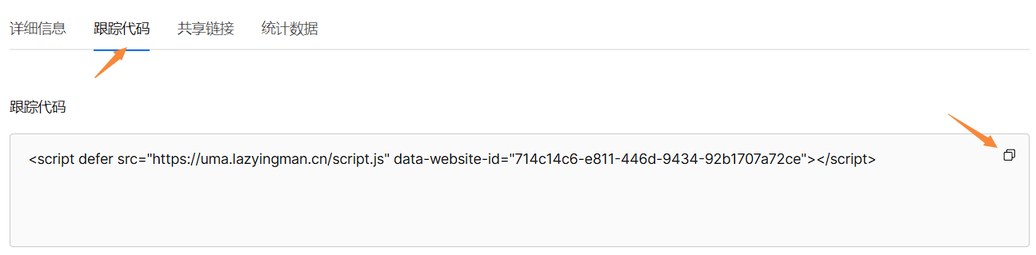
选择编辑中的跟踪代码,将代码插入到网站的每一页即可
butterfly用户的可以把代码插入到layout/includes/head.pug
1
2
| if theme.umami_analytics
script(defer, src='https://uma.lazyingman.cn/script.js', data-website-id=`${theme.umami_analytics.id}`)
|
在主题设置中写配置
1
2
3
| umami_analytics:
enable: true
id: "你的id"
|
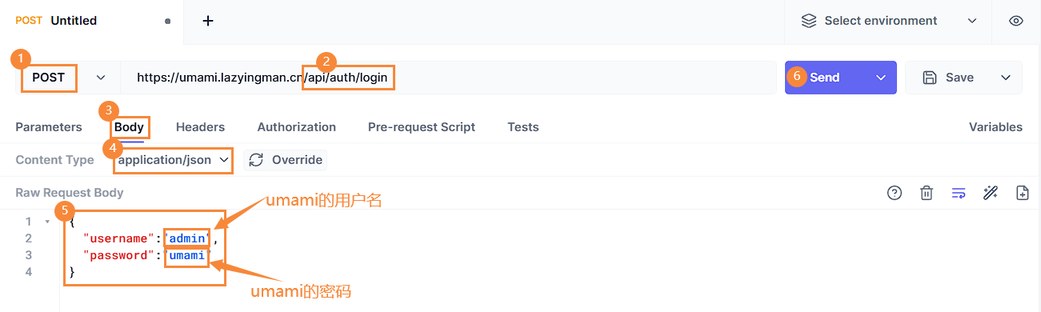
获取tocken
首先进入Hoppscotch获取tocken: https://hoppscotch.io/
输入https:你的umami网址/api/auth/login
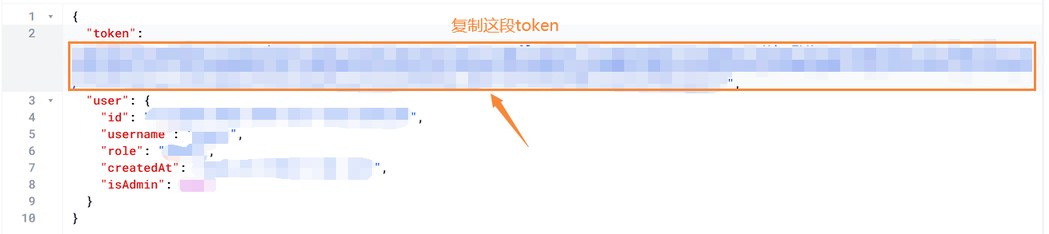
发送成功后会返回token
访问统计的数据参考Heo的umami代码
1
2
3
4
5
6
7
8
9
10
11
12
13
14
15
16
17
18
19
20
21
22
23
24
25
26
27
28
29
30
31
32
33
34
35
36
37
38
39
40
41
42
43
44
45
46
47
48
49
50
51
52
53
54
55
56
57
58
59
60
61
62
63
64
65
66
67
68
69
70
71
72
73
74
75
76
77
| <?php
header('Content-Type: application/json');
header("Access-Control-Allow-Origin: *");
// 配置 Umami API 的凭据
$apiBaseUrl = '部署好的umami网址';
$token = '刚刚复制的token';
$websiteId = '你的data-website-id';
$cacheFile = 'umami_cache.json';
$cacheTime = 600; // 缓存时间为10分钟(600秒)
// 获取当前时间戳(毫秒级)
$currentTimestamp = time() * 1000;
// Umami API 的起始时间戳(毫秒级)
$startTimestampToday = strtotime("today") * 1000;
$startTimestampYesterday = strtotime("yesterday") * 1000;
$startTimestampLastMonth = strtotime("-1 month") * 1000;
$startTimestampLastYear = strtotime("-1 year") * 1000;
// 定义 Umami API 请求函数
function fetchUmamiData($apiBaseUrl, $websiteId, $startAt, $endAt, $token) {
$url = "$apiBaseUrl/api/websites/$websiteId/stats?" . http_build_query([
'startAt' => $startAt,
'endAt' => $endAt
]);
$options = [
'http' => [
'method' => 'GET',
'header' => [
"Authorization: Bearer $token",
"Content-Type: application/json"
]
]
];
$context = stream_context_create($options);
$response = @file_get_contents($url, false, $context);
if ($response === FALSE) {
$error = error_get_last();
echo "Error fetching data: " . $error['message'] . "\n";
echo "URL: " . $url . "\n";
return null;
}
return json_decode($response, true);
}
// 检查缓存文件是否存在且未过期
if (file_exists($cacheFile) && (time() - filemtime($cacheFile) < $cacheTime)) {
// 读取缓存文件
$cachedData = file_get_contents($cacheFile);
echo $cachedData;
} else {
// 获取统计数据
$todayData = fetchUmamiData($apiBaseUrl, $websiteId, $startTimestampToday, $currentTimestamp, $token);
$yesterdayData = fetchUmamiData($apiBaseUrl, $websiteId, $startTimestampYesterday, $startTimestampToday, $token);
$lastMonthData = fetchUmamiData($apiBaseUrl, $websiteId, $startTimestampLastMonth, $currentTimestamp, $token);
$lastYearData = fetchUmamiData($apiBaseUrl, $websiteId, $startTimestampLastYear, $currentTimestamp, $token);
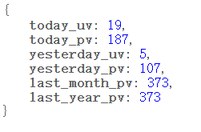
// 组装返回的 JSON 数据
$responseData = [
"today_uv" => $todayData['visitors']['value'] ?? null,
"today_pv" => $todayData['pageviews']['value'] ?? null,
"yesterday_uv" => $yesterdayData['visitors']['value'] ?? null,
"yesterday_pv" => $yesterdayData['pageviews']['value'] ?? null,
"last_month_pv" => $lastMonthData['pageviews']['value'] ?? null,
"last_year_pv" => $lastYearData['pageviews']['value'] ?? null
];
// 将数据写入缓存文件
file_put_contents($cacheFile, json_encode($responseData));
// 输出 JSON 数据
echo json_encode($responseData);
}
?>
|
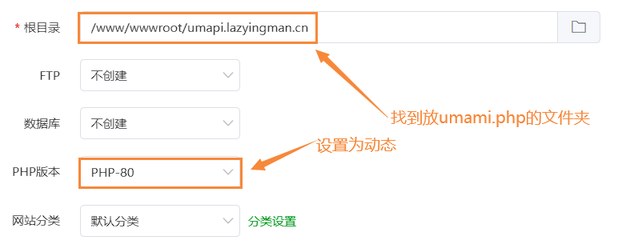
添加一个站点,将php文件放入网站路径文件夹,设置好域名
然后就可以通过域名和路径访问了例如我的:https://umapi.lazyingman.cn/umami.php